はじめに
LangGraphを知らない方、わからない方は、まず「LangGraphとは」をご覧ください。 この記事ではLangGraphを始めて使う方に向けて、LangGraphの公式ページに用意されているチュートリアルを解説します。今回解説するチュートリアルは「Code generation with RAG and self-correction」です。
記事の対象者
- LangGraph初学者
- LangChain初学者
チュートリアルの概要
ユーザのドキュメントと質問に対して、コードを生成します。 コードを生成したあとにテストを行いテストが通らなかった場合は、テストが通るまでコードを生成を繰り返します。
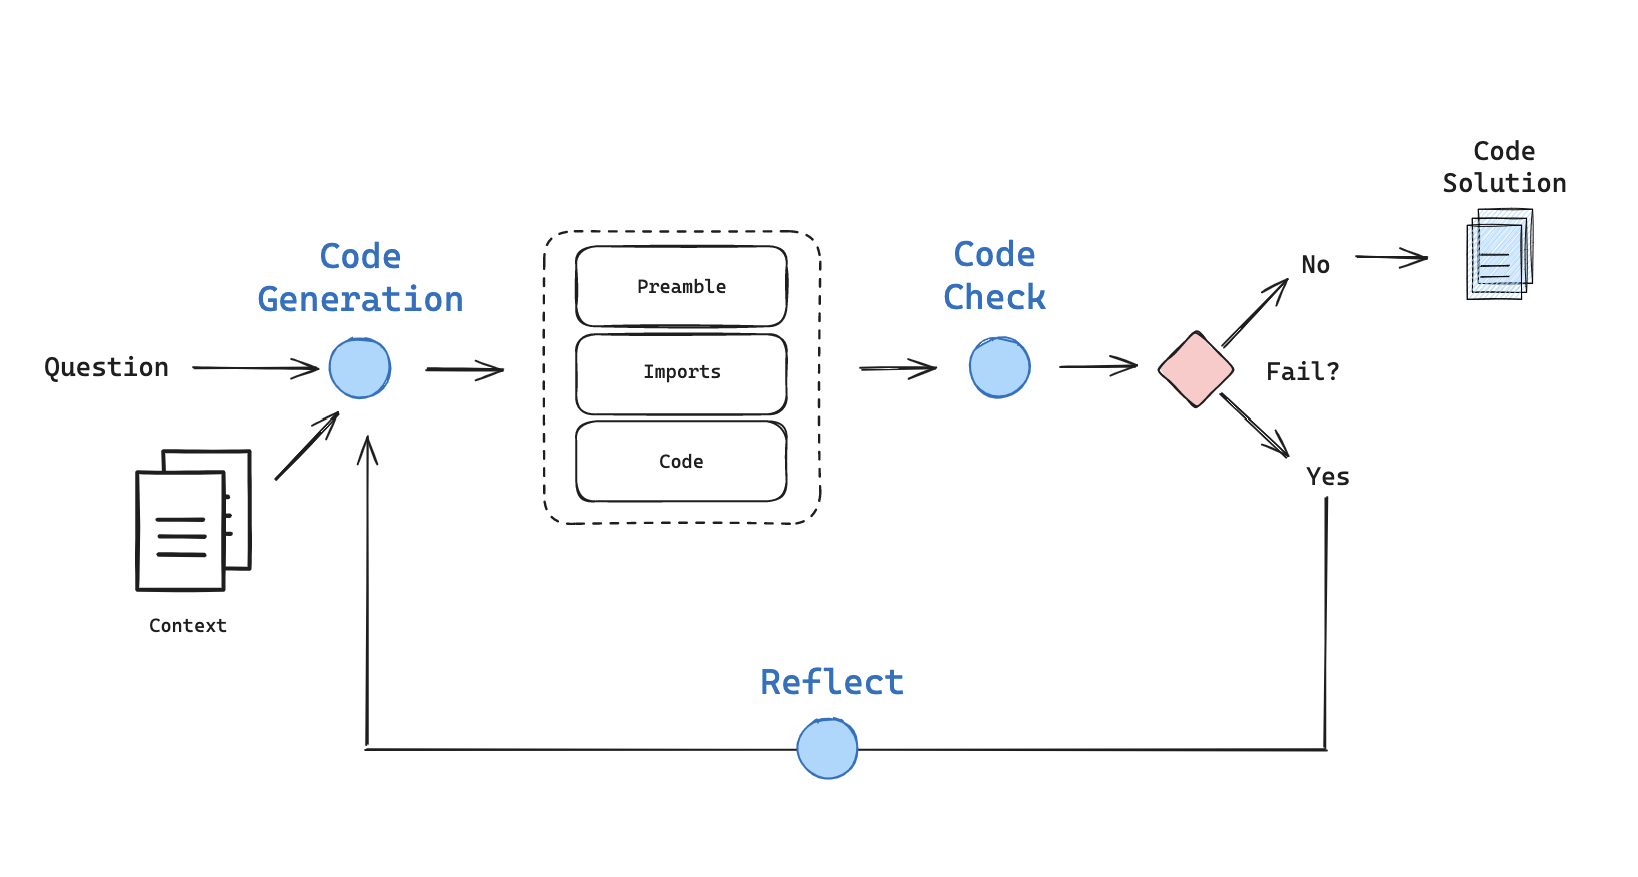
AlphaCodium は、制御フローを使用してコード生成を行うという手法でLLMのパフォーマンスを向上させます。 AlphaCodium が備えている特定の質問に対して公開テストとAI生成テストの回答を反復的にテストし、改善するというアイデアの一部をLangGraphを使用してゼロから実装します。
チュートリアルの解説
ステップ
- 実行環境
- インストール
- ドキュメントの取得
- 解決策の生成
- 状態遷移の定義
- グラフの作成
- グラフの実行
0. 実行環境
Colab
LangChain==1.2.3
Python==3.10.1
1. インストール
今回のチュートリアルに必要なライブラリのインストール、APIキーの設定をします。 ライブラリのインストールは以下のコマンドを実行してください。
pip install langgraph langchain langchain-openai
pip install langchain_community
次にOpenAIのAPIキーを環境変数に設定する必要があります。チュートリアルに以下のコードを追加してください。
import os

os.environ["OPENAI_API_KEY"] = "YOUR_API_KEY"
2. ドキュメントの取得
まず、ユーザーが作成したいコーディング内容を含むドキュメントを指定し取り込みます。
from bs4 import BeautifulSoup as Soup
from langchain_community.document_loaders.recursive_url_loader import RecursiveUrlLoader

# LCEL docs
url = "https://python.langchain.com/v0.2/docs/concepts/#langchain-expression-language-lcel"
loader = RecursiveUrlLoader(
    url=url, max_depth=20, extractor=lambda x: Soup(x, "html.parser").text
)
docs = loader.load()

# Sort the list based on the URLs and get the text
d_sorted = sorted(docs, key=lambda x: x.metadata["source"])
d_reversed = list(reversed(d_sorted))
concatenated_content = "\n\n\n --- \n\n\n".join(
    [doc.page_content for doc in d_reversed]
)
コード解説
# LCEL docs
url = "https://python.langchain.com/v0.2/docs/concepts/#langchain-expression-language-lcel"
loader = RecursiveUrlLoader(
    url=url, max_depth=20, extractor=lambda x: Soup(x, "html.parser").text
)
docs = loader.load()
今回はスクレイピングを行ってドキュメントの取得を行います。
url に学習させたいプログラムを含むサイトurlを指定します。
langchain_communityのライブラリRecursiveUrlLoader は指定した配下のサイトに対してスクレイピングを実行し、その結果をドキュメントとして取り込みます。
3. 解決策の生成
LLMに対し、ドキュメンテーションを学習させ、ユーザーに対してコーディングのアシスタントを行うよう指示を出します。
from langchain_core.prompts import ChatPromptTemplate
from langchain_core.pydantic_v1 import BaseModel, Field
from langchain_openai import ChatOpenAI

### OpenAI

# Grader prompt
code_gen_prompt = ChatPromptTemplate.from_messages(
    [
        (
            "system",
            """You are a coding assistant with expertise in LCEL, LangChain expression language. \n
    Here is a full set of LCEL documentation:  \n ------- \n  {context} \n ------- \n Answer the user
    question based on the above provided documentation. Ensure any code you provide can be executed \n
    with all required imports and variables defined. Structure your answer with a description of the code solution. \n
    Then list the imports. And finally list the functioning code block. Here is the user question:""",
        ),
        ("placeholder", "{messages}"),
    ]
)


# Data model
class code(BaseModel):
    """Code output"""

    prefix: str = Field(description="Description of the problem and approach")
    imports: str = Field(description="Code block import statements")
    code: str = Field(description="Code block not including import statements")
    description = "Schema for code solutions to questions about LCEL."


expt_llm = "gpt-4-0125-preview"
llm = ChatOpenAI(temperature=0, model=expt_llm)
code_gen_chain = code_gen_prompt | llm.with_structured_output(code)
question = "How do I build a RAG chain in LCEL?"
# solution = code_gen_chain_oai.invoke({"context":concatenated_content,"messages":[("user",question)]})
コード解説
# Data model
class code(BaseModel):
    """Code output"""

    prefix: str = Field(description="Description of the problem and approach")
    imports: str = Field(description="Code block import statements")
    code: str = Field(description="Code block not including import statements")
    description = "Schema for code solutions to questions about LCEL."


expt_llm = "gpt-4-0125-preview"
llm = ChatOpenAI(temperature=0, model=expt_llm)
code_gen_chain = code_gen_prompt | llm.with_structured_output(code)
question = "How do I build a RAG chain in LCEL?"
code 関数は、出力形式を以下のmetadataで定義します
prefix: 問題点の説明とアプローチ
imports : コードのimport箇所のみ
code :コードのimport以外の箇所
description : LCELに関する質問に対しての改善策として提示されたコードについての説明
これらのmetadataをLLMに渡すことで、モデルは指定に沿って構造化された出力を行うことができます。
4. 状態の定義
次に、チャットボットの状態遷移を定義します。これにより、どの状態でどのアクションを実行するかを決定します。
from typing import List, TypedDict


class GraphState(TypedDict):
    """
    Represents the state of our graph.

    Attributes:
        error : Binary flag for control flow to indicate whether test error was tripped
        messages : With user question, error messages, reasoning
        generation : Code solution
        iterations : Number of tries
    """

    error: str
    messages: List
    generation: str
    iterations: int
このクラスではコードの推論の状態を表します
error テストエラーがトリップしたかどうかを示すフラグ
messages ユーザーの質問、エラーメッセージ、推論が格納される
generation 解答コード
iterations 試行回数
5. グラフの作成
定義した状態とチェーンを使用してグラフを作成します。以下がそのコード全体です。
from langchain_core.pydantic_v1 import BaseModel, Field

### Parameter

# Max tries
max_iterations = 3
# Reflect
# flag = 'reflect'
flag = "do not reflect"

### Nodes


def generate(state: GraphState):
    """
    Generate a code solution

    Args:
        state (dict): The current graph state

    Returns:
        state (dict): New key added to state, generation
    """

    print("---GENERATING CODE SOLUTION---")

    # State
    messages = state["messages"]
    iterations = state["iterations"]
    error = state["error"]

    # We have been routed back to generation with an error
    if error == "yes":
        messages += [
            (
                "user",
                "Now, try again. Invoke the code tool to structure the output with a prefix, imports, and code block:",
            )
        ]

    # Solution
    code_solution = code_gen_chain.invoke(
        {"context": concatenated_content, "messages": messages}
    )
    messages += [
        (
            "assistant",
            f"{code_solution.prefix} \n Imports: {code_solution.imports} \n Code: {code_solution.code}",
        )
    ]

    # Increment
    iterations = iterations + 1
    return {"generation": code_solution, "messages": messages, "iterations": iterations}


def code_check(state: GraphState):
    """
    Check code

    Args:
        state (dict): The current graph state

    Returns:
        state (dict): New key added to state, error
    """

    print("---CHECKING CODE---")

    # State
    messages = state["messages"]
    code_solution = state["generation"]
    iterations = state["iterations"]

    # Get solution components
    imports = code_solution.imports
    code = code_solution.code

    # Check imports
    try:
        exec(imports)
    except Exception as e:
        print("---CODE IMPORT CHECK: FAILED---")
        error_message = [("user", f"Your solution failed the import test: {e}")]
        messages += error_message
        return {
            "generation": code_solution,
            "messages": messages,
            "iterations": iterations,
            "error": "yes",
        }

    # Check execution
    try:
        exec(imports + "\n" + code)
    except Exception as e:
        print("---CODE BLOCK CHECK: FAILED---")
        error_message = [("user", f"Your solution failed the code execution test: {e}")]
        messages += error_message
        return {
            "generation": code_solution,
            "messages": messages,
            "iterations": iterations,
            "error": "yes",
        }

    # No errors
    print("---NO CODE TEST FAILURES---")
    return {
        "generation": code_solution,
        "messages": messages,
        "iterations": iterations,
        "error": "no",
    }


def reflect(state: GraphState):
    """
    Reflect on errors

    Args:
        state (dict): The current graph state

    Returns:
        state (dict): New key added to state, generation
    """

    print("---GENERATING CODE SOLUTION---")

    # State
    messages = state["messages"]
    iterations = state["iterations"]
    code_solution = state["generation"]

    # Prompt reflection

    # Add reflection
    reflections = code_gen_chain.invoke(
        {"context": concatenated_content, "messages": messages}
    )
    messages += [("assistant", f"Here are reflections on the error: {reflections}")]
    return {"generation": code_solution, "messages": messages, "iterations": iterations}


### Edges


def decide_to_finish(state: GraphState):
    """
    Determines whether to finish.

    Args:
        state (dict): The current graph state

    Returns:
        str: Next node to call
    """
    error = state["error"]
    iterations = state["iterations"]

    if error == "no" or iterations == max_iterations:
        print("---DECISION: FINISH---")
        return "end"
    else:
        print("---DECISION: RE-TRY SOLUTION---")
        if flag == "reflect":
            return "reflect"
        else:
return "generate"from langgraph.graph import END, StateGraph, START
workflow = StateGraph(GraphState)
# Define the nodes
workflow.add_node("generate", generate) # generation solution
workflow.add_node("check_code", code_check) # check code
workflow.add_node("reflect", reflect) # reflect
# Build graph
workflow.add_edge(START, "generate")
workflow.add_edge("generate", "check_code")
workflow.add_conditional_edges(
"check_code",
decide_to_finish,
{
"end": END,
"reflect": "reflect",
"generate": "generate",
},
)
workflow.add_edge("reflect", "generate")
app = workflow.compile()コード解説
# Max tries
max_iterations = 3
# Reflect
# flag = 'reflect'
flag = "do not reflect"
処理フローの条件分岐の判定に使用する変数を定義します。
max_iterations コード生成・改善の試行回数の最大値。
flag 処理の終了判定を行うフラグの初期値。
def generate(state: GraphState):
    """
    Generate a code solution

    Args:
        state (dict): The current graph state

    Returns:
        state (dict): New key added to state, generation
    """

    print("---GENERATING CODE SOLUTION---")

    # State
    messages = state["messages"]
    iterations = state["iterations"]
    error = state["error"]

    # We have been routed back to generation with an error
    if error == "yes":
        messages += [
            (
                "user",
                "Now, try again. Invoke the code tool to structure the output with a prefix, imports, and code block:",
            )
        ]

    # Solution
    code_solution = code_gen_chain.invoke(
        {"context": concatenated_content, "messages": messages}
    )
    messages += [
        (
            "assistant",
            f"{code_solution.prefix} \n Imports: {code_solution.imports} \n Code: {code_solution.code}",
        )
    ]

    # Increment
    iterations = iterations + 1
    return {"generation": code_solution, "messages": messages, "iterations": iterations}
generate 関数はユーザー質問と取り込んだドキュメントを受け取り、コードを作成する関数です。
まずerrorの値を判定し、前回の処理でテストエラーが発生していると判定した場合には、再度のコード生成を行うよう質問を変更します。
code_solution はユーザー質問とプロンプト、ドキュメントをLLMに読み込ませ、コード生成を行った結果とその解説文を受け取ります。最後に処理の実行回数をカウントするiterations を更新し、これらの結果を返します。
def code_check(state: GraphState):
    """
    Check code

    Args:
        state (dict): The current graph state

    Returns:
        state (dict): New key added to state, error
    """

    print("---CHECKING CODE---")

    # State
    messages = state["messages"]
    code_solution = state["generation"]
    iterations = state["iterations"]

    # Get solution components
    imports = code_solution.imports
    code = code_solution.code

    # Check imports
    try:
        exec(imports)
    except Exception as e:
        print("---CODE IMPORT CHECK: FAILED---")
        error_message = [("user", f"Your solution failed the import test: {e}")]
        messages += error_message
        return {
            "generation": code_solution,
            "messages": messages,
            "iterations": iterations,
            "error": "yes",
        }

    # Check execution
    try:
        exec(imports + "\n" + code)
    except Exception as e:
        print("---CODE BLOCK CHECK: FAILED---")
        error_message = [("user", f"Your solution failed the code execution test: {e}")]
        messages += error_message
        return {
            "generation": code_solution,
            "messages": messages,
            "iterations": iterations,
            "error": "yes",
        }

    # No errors
    print("---NO CODE TEST FAILURES---")
    return {
        "generation": code_solution,
        "messages": messages,
        "iterations": iterations,
        "error": "no",
}codecheck関数ではgenerate 関数が出力したコードをテスト実行し、エラーが発生していないかを判定します。
コードのインポート部分imports 、インポート以外の処理部分code をgenerate の結果から受け取り、それぞれを実行します。エラーが発生した場合にはGraphStateクラスのmessage にエラー処理が起きた旨とエラーメッセージを追記し、errorを”yes”に更新します。
def reflect(state: GraphState):
    """
    Reflect on errors

    Args:
        state (dict): The current graph state

    Returns:
        state (dict): New key added to state, generation
    """

    print("---GENERATING CODE SOLUTION---")

    # State
    messages = state["messages"]
    iterations = state["iterations"]
    code_solution = state["generation"]

    # Prompt reflection

    # Add reflection
    reflections = code_gen_chain.invoke(
        {"context": concatenated_content, "messages": messages}
    )
    messages += [("assistant", f"Here are reflections on the error: {reflections}")]
    return {"generation": code_solution, "messages": messages, "iterations": iterations}
refrect 関数ではテスト実行でエラーが発生した際に、エラーをGraphStateに反映します。
reflections ではエラーメッセージを踏まえてコード生成を再実行します。コード生成の結果とエラーメッセージをmessagesに追記します。
workflow = StateGraph(GraphState)

# Define the nodes
workflow.add_node("generate", generate)  # generation solution
workflow.add_node("check_code", code_check)  # check code
workflow.add_node("reflect", reflect)  # reflect

# Build graph
workflow.add_edge(START, "generate")
workflow.add_edge("generate", "check_code")
workflow.add_conditional_edges(
    "check_code",
    decide_to_finish,
    {
        "end": END,
        "reflect": "reflect",
        "generate": "generate",
    },
)
workflow.add_edge("reflect", "generate")
app = workflow.compile()各関数の実行順序を指定します。check_code の次の処理はdecide_to_finish の結果により分岐します。
def decide_to_finish(state: GraphState):
    """
    Determines whether to finish.

    Args:
        state (dict): The current graph state

    Returns:
        str: Next node to call
    """
    error = state["error"]
    iterations = state["iterations"]

    if error == "no" or iterations == max_iterations:
        print("---DECISION: FINISH---")
        return "end"
    else:
        print("---DECISION: RE-TRY SOLUTION---")
        if flag == "reflect":
            return "reflect"
        else:
            return "generate"
decide_to_finish はcheck_code の次の処理を判定する関数です。
前回のノードでテスト実行でエラーが発生している場合、または最大試行回数に達した場合は処理を終了する。それ以外の場合はGraphStateの持つフラグに従って処理を分岐する。
6. グラフの実行
作成したグラフを使用して一連のフローを実行します。
question = "How can I directly pass a string to a runnable and use it to construct the input needed for my prompt?"
app.invoke({"messages": [("user", question)], "iterations": 0}
このコードはユーザーの質問に対してコードを生成し、そのコードに対してテストを実行してエラーが発生しなかった場合は結果を返し、エラーが発生した場合はエラーを踏まえてコードを再生成します。
実行してみたところ、期待通りにテスト実行と改善を繰り返すフローを辿りました。しかし最大試行回数までにテストエラーを解消することがすることができませんでした。
今回のエラーはlangchain_communityのライブラリRecursiveUrlLoader のバグによるもので、指定したurlの子ページの読み込みができていなかったため、質問に対する回答内容がRAGに見当たらず、ハルシネーションが起きてコードを捏造してしまったことが原因になります。
実行結果
---GENERATING CODE SOLUTION---
---CHECKING CODE---
---CODE IMPORT CHECK: FAILED---
---DECISION: RE-TRY SOLUTION---
---GENERATING CODE SOLUTION---
---CHECKING CODE---
---CODE IMPORT CHECK: FAILED---
---DECISION: RE-TRY SOLUTION---
---GENERATING CODE SOLUTION---
---CHECKING CODE---
---CODE IMPORT CHECK: FAILED---
---DECISION: FINISH---
{'error': 'yes',
 'messages': [('user',
   'How can I directly pass a string to a runnable and use it to construct the input needed for my prompt?'),
  ('assistant',
   'Passing a string directly to a runnable in LCEL \n Imports: from langchain_core import Runnable\nfrom langchain_core.prompts import PromptTemplate \n Code: class DirectStringInputRunnable(Runnable):\n    def __init__(self, prompt_template):\n        self.prompt_template = prompt_template\n\n    async def invoke(self, input_data):\n        # Assuming input_data is a string\n        formatted_input = self.prompt_template.invoke({\'input_string\': input_data})\n        # Now formatted_input can be used as the input for further processing\n        # For example, passing it to an LLM or another component\n        return formatted_input\n\n# Example usage\nprompt_template = PromptTemplate.from_template("Your input was: {input_string}")\nrunnable = DirectStringInputRunnable(prompt_template)\n\n# Simulate invoking the runnable with a string\nasync_result = await runnable.invoke("Hello, LCEL!")\nprint(async_result)'),
  ('user',
   "Your solution failed the import test: cannot import name 'Runnable' from 'langchain_core' (/usr/local/lib/python3.10/dist-packages/langchain_core/__init__.py)"),
  ('user',
   'Now, try again. Invoke the code tool to structure the output with a prefix, imports, and code block:'),
  ('assistant',
   'To directly pass a string to a runnable and use it for constructing the input needed for a prompt in LCEL, you can create a custom runnable class that takes a string, formats it using a prompt template, and then uses this formatted string as input for further processing. This approach allows for flexible input handling within your LCEL chains. Here\'s how you can implement this: \n Imports: from langchain_core.runnables import BaseRunnable\nfrom langchain_core.prompts import PromptTemplate \n Code: class StringInputRunnable(BaseRunnable):\n    def __init__(self, prompt_template_str):\n        self.prompt_template = PromptTemplate.from_template(prompt_template_str)\n\n    async def invoke(self, input_data, **kwargs):\n        # Assuming input_data is a string to be formatted\n        formatted_input = self.prompt_template.invoke({\'input_string\': input_data})\n        # Now, formatted_input can be used as the input for further processing\n        # This can include passing it to an LLM, another runnable, etc.\n        return formatted_input\n\n# Example usage\nprompt_template_str = "Your input was: {input_string}"\nrunnable = StringInputRunnable(prompt_template_str)\n\n# Simulate invoking the runnable with a string\n# Note: In actual usage, this would be part of an async event loop\nimport asyncio\nasync def run_example():\n    result = await runnable.invoke("Hello, LCEL!")\n    print(result)\n\nasyncio.run(run_example())'),
  ('user',
   "Your solution failed the import test: cannot import name 'BaseRunnable' from 'langchain_core.runnables' (/usr/local/lib/python3.10/dist-packages/langchain_core/runnables/__init__.py)"),
  ('user',
   'Now, try again. Invoke the code tool to structure the output with a prefix, imports, and code block:'),
  ('assistant',
   'To directly pass a string to a runnable and construct the input for a prompt in LCEL, you can create a custom runnable class. This class will take a string, use a prompt template to format it, and then use this formatted input for further processing. Here\'s a structured approach to implement this functionality: \n Imports: from langchain.runnables import Runnable\nfrom langchain.prompts import PromptTemplate \n Code: class StringInputRunnable(Runnable):\n    def __init__(self, template):\n        self.template = PromptTemplate(template)\n\n    async def invoke(self, input_string, **kwargs):\n        # Use the template to format the input string\n        prompt = self.template.fill({\'input_string\': input_string})\n        # The formatted prompt can now be used for further processing\n        # For example, passing it to an LLM or another component\n        return prompt\n\n# Example usage\n# Define your prompt template with placeholders\ntemplate = "This is your input: {input_string}"\n# Create an instance of your custom runnable\nrunnable = StringInputRunnable(template)\n\n# Example input string\ntest_input = "Hello, world!"\n# Invoke the runnable with the input string\nresult = asyncio.run(runnable.invoke(test_input))\nprint(result)'),
  ('user',
   "Your solution failed the import test: cannot import name 'Runnable' from 'langchain.runnables' (/usr/local/lib/python3.10/dist-packages/langchain/runnables/__init__.py)")],
 'generation': code(prefix="To directly pass a string to a runnable and construct the input for a prompt in LCEL, you can create a custom runnable class. This class will take a string, use a prompt template to format it, and then use this formatted input for further processing. Here's a structured approach to implement this functionality:", imports='from langchain.runnables import Runnable\nfrom langchain.prompts import PromptTemplate', code='class StringInputRunnable(Runnable):\n    def __init__(self, template):\n        self.template = PromptTemplate(template)\n\n    async def invoke(self, input_string, **kwargs):\n        # Use the template to format the input string\n        prompt = self.template.fill({\'input_string\': input_string})\n        # The formatted prompt can now be used for further processing\n        # For example, passing it to an LLM or another component\n        return prompt\n\n# Example usage\n# Define your prompt template with placeholders\ntemplate = "This is your input: {input_string}"\n# Create an instance of your custom runnable\nrunnable = StringInputRunnable(template)\n\n# Example input string\ntest_input = "Hello, world!"\n# Invoke the runnable with the input string\nresult = asyncio.run(runnable.invoke(test_input))\nprint(result)', description='Schema for code solutions to questions about LCEL.'),
 'iterations': 3}
実際に使ってみる
では実際に例を変えて期待した結果が得られるかいくつか確認してみましょう
例題1 Pythonのコード生成について質問
【ドキュメント】 Pythonのリファレンス 【質問文】 Write code to report this month's temperature in Tokyo and year-on-year comparison in a graph using Python?
【実行結果】
---GENERATING CODE SOLUTION---
---CHECKING CODE---
Write code to report this month's temperature in Tokyo and year-on-year comparison in a graph using Python
User input was: Write code to report this month's temperature in Tokyo and year-on-year comparison in a graph using Python
---NO CODE TEST FAILURES---
---DECISION: FINISH---
{'error': 'no',
 'messages': [('user',
   'How can I directly pass a string to a runnable and use it to construct the input needed for my prompt?'),
  ('assistant',
   "To directly pass a string to a runnable and use it to construct the input for your prompt, you can follow this approach: \n Imports: from io import StringIO\nimport sys \n Code: # Save the original stdin\noriginal_stdin = sys.stdin\n\n# Create a StringIO object containing the string you want to pass\ninput_data = StringIO('Your input string goes here')\n\n# Replace sys.stdin with the StringIO object, so input() will read from it\nsys.stdin = input_data\n\n# Example of using input() to read the passed string\nuser_input = input()\nprint(f'User input was: {user_input}')\n\n# Restore the original stdin\nsys.stdin = original_stdin")],
 'generation': code(prefix='To directly pass a string to a runnable and use it to construct the input for your prompt, you can follow this approach:', imports='from io import StringIO\nimport sys', code="# Save the original stdin\noriginal_stdin = sys.stdin\n\n# Create a StringIO object containing the string you want to pass\ninput_data = StringIO('Your input string goes here')\n\n# Replace sys.stdin with the StringIO object, so input() will read from it\nsys.stdin = input_data\n\n# Example of using input() to read the passed string\nuser_input = input()\nprint(f'User input was: {user_input}')\n\n# Restore the original stdin\nsys.stdin = original_stdin", description='This code snippet demonstrates how to simulate user input by redirecting `sys.stdin` to a `StringIO` object containing the desired input string. This allows you to programmatically provide input to functions or parts of your code that use the `input()` function, facilitating testing or automation of tasks that require user input. The `sys.stdin` is restored to its original state afterwards to ensure the rest of your program functions as expected.'),
 'iterations': 1}
例題2 Pandasについて質問
【ドキュメント】 pandasのリファレンス 【質問文】 "How do I plot a simple line chart?”
【実行結果】
---GENERATING CODE SOLUTION---
---CHECKING CODE---
---NO CODE TEST FAILURES---
---DECISION: FINISH---
{'error': 'no',
 'messages': [('user', 'How do I plot a simple line chart?'),
  ('assistant',
   "To plot a simple line chart in Python, you can use the matplotlib library, which is a widely used library for plotting graphs in Python. Here's a basic example of how to create a simple line chart using matplotlib. This example assumes you have a set of x and y coordinates that you want to plot.\n\n \n Imports: import matplotlib.pyplot as plt\nimport numpy as np \n Code: # Sample data for x and y coordinates\nx = np.arange(0, 10, 1) # Create an array of x values from 0 to 9\ny = x ** 2 # Calculate y values as square of x\n\n# Plotting the line chart\nplt.plot(x, y) # Plot x and y using default line style and color\nplt.title('Simple Line Chart') # Title of the chart\nplt.xlabel('X axis label') # X-axis label\nplt.ylabel('Y axis label') # Y-axis label\nplt.show() # Display the chart")],
 'generation': code(prefix="To plot a simple line chart in Python, you can use the matplotlib library, which is a widely used library for plotting graphs in Python. Here's a basic example of how to create a simple line chart using matplotlib. This example assumes you have a set of x and y coordinates that you want to plot.\n\n", imports='import matplotlib.pyplot as plt\nimport numpy as np', code="# Sample data for x and y coordinates\nx = np.arange(0, 10, 1) # Create an array of x values from 0 to 9\ny = x ** 2 # Calculate y values as square of x\n\n# Plotting the line chart\nplt.plot(x, y) # Plot x and y using default line style and color\nplt.title('Simple Line Chart') # Title of the chart\nplt.xlabel('X axis label') # X-axis label\nplt.ylabel('Y axis label') # Y-axis label\nplt.show() # Display the chart", description='This code snippet demonstrates how to plot a simple line chart using matplotlib and numpy in Python. It includes creating sample data, plotting the line chart, and adding labels and title to the chart.'),
 'iterations': 1}
まとめ
この記事では、LangGraphを使用して、ユーザーの質問に対して最適なコードを試行と改善を繰り返したうえで提案するコード生成アシスタントの作成方法を詳しく解説しました。 このチュートリアルを通じて、LangGraphの基本的な使い方と、コード生成アシスタント機能の実装方法を学んでいただけたと思います。
参考文献
https://langchain-ai.github.io/langgraph/tutorials/code_assistant/langgraph_code_assistant/